
 When we work on graphic design we need stylish text effect. In this photoshop tutorial I am teaching how to create a grassy text effect in Photoshop. Like the image below. Here I have created the effect only on a letter "W". You can apply this effect on any word or sentence or paragraph. If you want to learn it, follow this photoshop tutorial step by step.
Final Preview of grassy text effect.
Step 1: Make a
new document at 1100 x 500 px. See below picture.

Step 2: Select
gradient tool (g) and set radial gradient like below.

Step 3: Apply
gradient top left corner to bottom right corner like the picture below.

Step 4: Select text
tool (t) and choose front Arial Black. Front color code #232d1e and front size
250 like below picture. If you don’t find character palate go window>character.

Step 5: Write click on the text layer and click on rasterize. And then go to filter menu > Noise > Median and set Radius 14px like the command bellow.
Step 6: Set foreground
and background color like below.

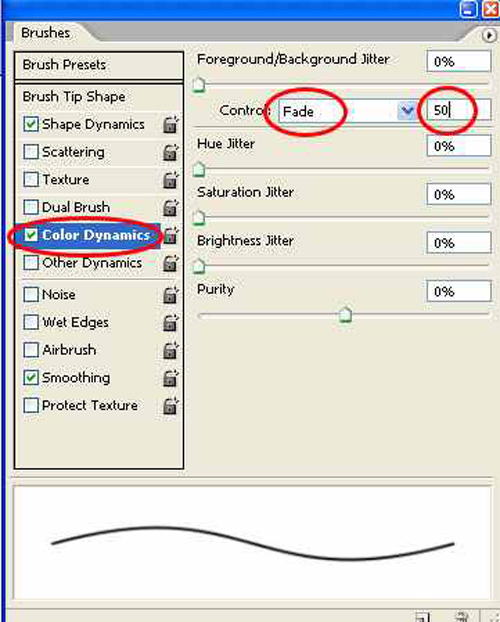
Step 7: Select Brush
tool (b) then go to window menu > Brush and follow the command below 1by 1.


Step 8: Create a new
layer. Rename the layer Fuzz (not mandatory) and Drug mouse pointer on the text
like the picture below.

Step 9: Drug again and
again by taking some time till the picture looks like below.

Step 10: By selecting
Text layer go to Filter>Blur>Gaussain Blur. Here set 3ps asRadius.
Step 11: Select the
Text layer again and Go to Filter menu > Noise > Add noise. Set
amount 38%.

Step 12: Again Filter
menu > Blur >Gaussain blur and set Radius 1.3 px.

Step 13: While
selecting text layer, go to Layer Menu>layer atyle>drop shadow and follow
the command below.

Step 14: Create a new
layer Rename highlight and select foreground color white and then select brush
tool and drug like the picture below.

Step 15: Select the
new layer and select Overlay on the layer palate. Clipping layers (Click
between two layers with pressing alt key) See the below.

Step 16: Now go to Filter
menu>Blur>Gaussain Blur and set radius 1.3px.
Final Grassy Text Effect:
No comments:
Post a Comment